Mostrando postagens com marcador jQuery. Mostrar todas as postagens

jQuery 5 In One Image Effects For Your Photos On Blogger

Crack Page Blogger Logo IconBloggers are always using images and photos on their blogs so in this post we will see how you can add five different effects to those images.The neat thing about this is you just have to add some jQuery and Css to your template (We make it easy) then you can easily add from 5 hover effects to add some spice to your blog images.

Lets look through the effects and you can also check out the demo to see it in action.

The five effects will be :

Effect 1 - Popout, this is a basic pop out effect on hover the image will pop out from the page.
Effect 2 - SliceDown, The image will have an dark overlay and on hover a slice effect reveals the image clearly.
Effect 3 - BoxRandom, The image has a light overlay and on hover the image is revealed by boxes randomly clearing.
Effect 4 - FoldLeft, Once again the image has a light overlay and this time on hover an accordion fold effect reveals the image.
Effect 5 - RainGrowReverse, This time on hover the image is revealed from corner to corner.

View Demo Button

Add The Image Effects To Blogger

Click Here To View Full Post >>
0

Simple Stylish jQuery Image Slideshow For Blogger

Blogger jQuery
Today i want to bring you another neat Image slideshow for Blogger users.The slide show is simple to add to your blog, looks great and has some neat options.The width can be changed to the size of the area you want it placed on your blog, captions can also be added to the images.Once on your blog it will auto scroll through your images and also has controls for the user to manual scroll.This will look great on Photography Blogs, Business Blogs or for anyone looking to display some cool pics.

The original version comes from Basic jQuery Slider, i have made some changes to make it work better with blogger.Check out the demo below, i have the demo slider spanning the full width of the blog but as i said it can be changed.

View Demo Button
Click Here To View Full Post >>
0

Adding Post Titles To Older Post Newer Post Links On Blogger

Adding Post Titles To Older Post Newer Post Links On Blogger
One Wordpress feature i really like that is not available on Blogger is last post, next post links at the foot of the page with the actual titles of the posts they link to.On Blogger we have got Newer Post, Older Post links but the title of the post is not shown.I feel these links would get a super increase in clicks if the titles were connected.With simply "Newer" and "Older" people don't know what they are clicking the titles will catch the eye and thus entice more clicks.The knock on effect of this will see more page views that will lead to more return visitors, subscribers and followers.

I said this feature was not available on Blogger, that is until now.A few people have created hacks to add the titles to the older, newer links including myself but every time it had errors.However one hack i have seen does the job perfectly.
Click Here To View Full Post >>
0

Shareaholic jQuery Slide Bookmarking Gadget With Tooltips And Counters For Blogger And Wordpress

jQuery Bookmarking Social Gadget With Tooltips And Counters For Blogger
Over the years on Spice Up Your Blog i have found Social Bookmarking gadgets to be amongst the most popular posts.Whats more the most popular Bookmarking gadgets have been from the "Sharing Is Sexy" series.Back in May 2011 we published a post with The Awesome Complete Animated Sexy Social Bookmarks V3 For Blogger, that post really did cover all options.Today i want to give you something similar but with some cool extras.The Shareaholic bookmarking widget still has the "Drop Down" and "Slide Up" features but also features tool tips and counters showing how many times your posts were shared.Take a look at the demo and screenshot below (for the demo scroll to the foot of the post on the test blog).


View Demo Button
Click Here To View Full Post >>
0

The Default Theme Nivo Featured Posts Slider For Blogger

In the last post i showed you how to use the Pascal Theme Nivo Slider on Blogger.So in this post i have the second of the three Nivo themes, the default nivo slider.The default theme while looking more basic still has the cool transitions and other options like pop up captions.The slider is from Dev7 Studios and you can see the live demo below.

View Demo Button
Click Here To View Full Post >>
0

The Pascal Theme Nivo Featured Posts Slider For Blogger

The Nivo jQuery powered featured posts slider is one of the most popular sliders available.The nivo slider comes in three themes with various options for the design and functionality.I have received lots of requests for a tutorial on using the nivo slider on Blogger so in the next few posts i will show you how to use all three themes or versions of the nivo slider on Blogger.In this post we will start with the Pascal Theme which looks amazing.The Pascal theme uses the various transitions that make nivo so popular but also has some unique features.The slides appear on a stylish background with a 'Featured Ribbon' in the top corner and you can optionally add captions and links to the slides.Credits for the Nivo Slider go to Dev 7 Studios, you can see it in action on the demo page.

View Demo Button

Add The Pascal Theme Nivo Slider To Blogger


Remember Always Back Up Your Template Before You Make Changes - How To Back Up A Blogger Template

Step 1. In Your Blogger Dashboard Click Design > Edit Html

Step 2. Find the following piece of code in your blogs Html : (Click Ctrl and F for a search bar to help find the code - How To Find Code In Blogger Template Template)

]]></b:skin>

Step 3. Copy and Paste the following code Directly Above / Before ]]></b:skin>

Important - This is a scroll box make sure to get all the code.
/*Start Slider Css*/
/*
* jQuery Nivo Slider v2.6
* http://nivo.dev7studios.com
*
* Copyright 2011, Gilbert Pellegrom
* Free to use and abuse under the MIT license.
* http://www.opensource.org/licenses/mit-license.php
*
* March 2010
*/


/* The Nivo Slider styles */
#slider{
width:618px;
height:246px;
}
.nivoSlider {
position:relative;

}
.nivoSlider img {
position:absolute;
top:0px;
left:0px;
}
/* If an image is wrapped in a link */
.nivoSlider a.nivo-imageLink {
position:absolute;
top:0px;
left:0px;
width:100%;
height:100%;
border:0;
padding:0;
margin:0;
z-index:6;
display:none;
}
/* The slices and boxes in the Slider */
.nivo-slice {
display:block;
position:absolute;
z-index:5;
height:100%;
}
.nivo-box {
display:block;
position:absolute;
z-index:5;
}
/* Caption styles */
.nivo-caption {
position:absolute;
left:0px;
bottom:0px;
background:#000;
color:#fff;
opacity:0.8; /* Overridden by captionOpacity setting */
width:100%;
z-index:8;
}
.nivo-caption p {
padding:5px;
margin:0;
}
.nivo-caption a {
display:inline !important;
}
.nivo-html-caption {
display:none;
}
/* Direction nav styles (e.g. Next & Prev) */
.nivo-directionNav a {
position:absolute;
top:45%;
z-index:9;
cursor:pointer;
}
.nivo-prevNav {
left:0px;
}
.nivo-nextNav {
right:0px;
}
/* Control nav styles (e.g. 1,2,3...) */
.nivo-controlNav a {
position:relative;
z-index:9;
cursor:pointer;
}
.nivo-controlNav a.active {
font-weight:bold;
}
/*
Skin Name: Pascal Theme
Skin URI: http://nivo.dev7studios.com
Skin Type: fixed
Description: A nice, light skin for the Nivo Slider.
Version: 1.0
Author: Gilbert Pellegrom & Pascal Gartner
Author URI: http://dev7studios.com
*/

.theme-pascal.slider-wrapper {
background:url(https://blogger.googleusercontent.com/img/b/R29vZ2xl/AVvXsEgtNKr411i0weN5oly1jusbPQFBlmOvxT1M8nws0cp6FBvuxagYIrelt_ya9z1bc2oF5fzlviX79x9T7e7zMQmmc2RtgL6vAPV_wyENaAv94SlFoKpmhBmLNCbiD1FYMFuT5_8AyjOp0i84/s1600/slider.png) no-repeat;
width:668px;
height:299px;
margin:0 auto;
padding-top:17px;
position:relative;
}

.theme-pascal .nivoSlider {
position:relative;
width:630px;
height:235px;
margin-left:19px;
background:url(https://blogger.googleusercontent.com/img/b/R29vZ2xl/AVvXsEgv6bG3e26CQE1aJLSUeiHTWOHCgWzCXNU13E2ms05B6SDKtyfymDXI4T734F8le0ICqJrv85x5fa-bdSVNdB-I0e0TR5fxIERklXZiW34i9uTtlI-yQMWaRCCzBtKK8ekBGflSefoXMuST/s1600/loading.gif) no-repeat 50% 50%;
}
.theme-pascal .nivoSlider img {
position:absolute;
top:0px;
left:0px;
display:none;
width:630px; /* Make sure your images are the same size */
height:235px; /* Make sure your images are the same size */
}
.theme-pascal .nivoSlider a {
border:0;
display:block;
}

.theme-pascal .nivo-controlNav {
background:url(https://blogger.googleusercontent.com/img/b/R29vZ2xl/AVvXsEg8NPyk7-jLMH7OZfQYp53zPJZIN2dhfL3FgIu20GGq4Pm7cdGxzHUe8ibnHby4PVzlodVVg2jBiBubTT9zcoKSnoyBHC8lp9G160no9R4iNiGBYk8dnphuyTl501Kv64WDJqNtbVcaAgXL/s1600/controlnav.png) no-repeat;
width:251px;
height:40px;
position:absolute;
left:200px; /* Tweak this to center bullets */
bottom:-42px;
padding:8px 0 0 82px;
z-index:20;
}
.theme-pascal .nivo-controlNav a {
display:block;
width:22px;
height:22px;
background:url(https://blogger.googleusercontent.com/img/b/R29vZ2xl/AVvXsEiqljITAJdC1o4F-2YF1ooD_NYLLjY9pS6iAR96hNSQclmLcLvd0iQDvC1zAEsUws3xADwGPsXIRMWiYewswBsYK0wTTolusqTEZSOFFRU64Q92-EAo0brNyS4eid5Dp9aR9ipECuxb0lj1/s1600/bullets.png) no-repeat;
text-indent:-9999px;
border:0;
margin-right:3px;
float:left;
}
.theme-pascal .nivo-controlNav a.active {
background-position:0 -22px;
}

.theme-pascal .nivo-directionNav a {
display:none;
}

.theme-pascal .nivo-caption {
bottom:40%;
left:auto;
right:0px;
width:auto;
max-width:630px;
overflow:hidden;
background:#fff;
text-shadow:none;
font-family: arial, serif;
color:#4c4b4b;
}
.theme-pascal .nivo-caption p {
padding:5px 15px;
color:#333;
font-weight:bold;
font-size:27px;
text-transform:uppercase;
}
.theme-pascal .nivo-caption a {
color:#333;
font-weight:bold;
font-size:27px;
text-transform:uppercase;
}

.theme-pascal .ribbon {
background:url(https://blogger.googleusercontent.com/img/b/R29vZ2xl/AVvXsEj60M0_etFVSGLWX2A-U9vMdyJnRl9wlnoH9Grm7fxYWCXEqHRS61WRJkZa7uoC3VEmqpYIC62rm3DAgFRHq-oUKzkSSSLHtH7EtHN4qdoWkJY7gzBuSegYo62kEuJOqcIwk7qqzmMUXDMw/s1600/ribbon.png) no-repeat;
width:111px;
height:111px;
position:absolute;
top:-8px;
left:-8px;
z-index:300;
}
/*End Slider Css*/

Step 4. Find the following piece of code in your blogs Html : (Click Ctrl and F for a search bar to help find the code - How To Find Code In Blogger Template Template)

</head>

Step 5. Copy and paste the following code directly above </head>

If you have previously added jQuery script to your template remove the line in green.
<!--Start Slider Scripts-->
<script src='http://code.jquery.com/jquery-1.6.1.min.js' type='text/javascript'/>
<script src='http://yourjavascript.com/8855314511/jquery.nivo.slider.pack.js' type='text/javascript'/>
<script type='text/javascript'>
$(window).load(function() {
$(&#39;#slider&#39;).nivoSlider();
});
</script>
<!--End Slider Scripts info @ http://www.spiceupyourblog.com-->

That's the Css and scrips added for the slider to work next we add the slides.

We will be adding the slider across your blog below the header.This area is called Cross Column and can be seen in the image below.If your blog does not have this section available you can see how to enable it here - Add Full Width Cross Column Gadgets To Blogger.


Adding HTML For The Slides


The HTML for the slides goes in a Html/Javascript gadget in the cross column section as shown above.

Below is the html for the slider in the demo.There is no really easy way to explain it so you will need to take a minute to figure out the code.I have the URLs (The Destination of the slide when clicked) is in red, the image is in green and the caption (Optional) is in yellow.Each slide works in the same way, you can just copy and paste this code and replace the URL, Image and captions.To add extra slides you can repeat one of the sections and once again add your URL, Image and Caption.

<div class="slider-wrapper theme-pascal">
<div class="ribbon"></div>

<div id="slider" class="nivoSlider">

<a href="http://www.spiceupyourblog.com"><img src="https://blogger.googleusercontent.com/img/b/R29vZ2xl/AVvXsEhtRG4ycqEQZYHwI5sY_hoCCEC1MGquIRZQlgNKBkg5WjYCbxMCf46wdrICknaKQUDoFcNiCYQOEE7ObYRzvYhjoVE9QEUPxpCLCfst3HDWrKqvRkyeHoSavkj_rIEc8KCJ7UWmh5LW2DE3/s1600/nemo.jpg" alt="" /></a>
<a href="http://www.spiceupyourblog.com"><img src="https://blogger.googleusercontent.com/img/b/R29vZ2xl/AVvXsEhCn96habYj2WpR-84vSOC5vJZKvER9OhxOC40XEeMeH6ZrmaTibxfHl-FHn4lrU9S2jTg6KG1NNwSZkbdtCwtb_GyrfdpvLi-U4EW15B0xEqXW42Y0z53ukLfIRoVSkrmCzqWwkbqourEN/s1600/toystory.jpg" alt="" title="This is an example of a caption" /></a>

<a href="http://www.spiceupyourblog.com"><img src="https://blogger.googleusercontent.com/img/b/R29vZ2xl/AVvXsEh4OM4aG0f5wYkEcWBC2J7NJ90ttYlQZvmmKcXVqkpLyE2gcXfr7wovV7DQJ5Bx-ITRswar3tGIl6IkW2YEqNT7CIh5iJ8sV2WVKCN5Pp5NzW4rLkvGrngYSv1EGBEaTujiKx60j2V2z40X/s1600/up.jpg" alt="" /></a>

<a href="http://www.spiceupyourblog.com"><img src="https://blogger.googleusercontent.com/img/b/R29vZ2xl/AVvXsEjvQifOWnZ6zO9AmB1gyO8eSZsnsXtBmNqLZJZ-RfbVonwNrtCIWdBwoL8YpICvpF-rdDFhJX3zZK4tTBAC8p4SQMakIV0u-cGfVciO6OuA6lIqw3QiMvLjQg_nOQoT7z-RP63sGvB33HJe/s1600/walle.jpg" alt="" title="#htmlcaption" /></a>
</div>
<div id="htmlcaption" class="nivo-html-caption">
<strong>This is an example of a caption.
</div>

</div>

That's it over the next few posts we will cover the other versions of the nivo slider.Make sure to check out more of our jQuery tutorials.

Drop your comments and questions below.
0

jQuery Fade In Scroll To Top Button With Smooth Scroll For Blogger

jQuery smooth scroll to topIn October last year i wrote a post with a Floating back to top button.Since then i have wanted to cover a more up to date back to top modern button.The popular option when it comes to scroll top buttons is to use jQuery for two reasons.Firstly with jQuery you can have the button hidden until the page is scrolled, secondly when clicked the page scrolls smoothly to the top instead of the direct jump a regular link would have.So that's exactly what i have in this tutorial.We will add a button that will only be visible when the reader starts scrolling and then when they click it the page slowly scrolls up easing into position at the top.For the button itself we us a sprite to create a hover effect sprites also keep the page load time down.

I recently started a blog in which i want to list the Best Design and Blogging posts, codes, tutorials and resources.On that blog i have the back to top button we cover in this post so we will use that as the demo.When you land on the page start to scroll and you will see the button in the bottom right corner.

Design and Blog

Looks and Works great lets add it to your blog.Credits to Matt Verone, Wordpress users can use the plugin here.

Smooth Scroll jQuery Back To Top Button


Remember Always Back Up Your Template Before You Make Changes - How To Back Up A Blogger Template

Step 1. In Your (New Design) Blogger Dashboard Click The Drop Down Menu For Your Blog > Choose Template > Then Edit Html > Now Proceed as shown in the video Below :

Step 2. Find the following piece of code in your blogs Html : (Click Ctrl and F for a search bar to help find the code - How To Find Code In Blogger Template Template)

]]></b:skin>

Step 3. Copy and Paste the following code Directly Above / Before ]]></b:skin>


#toTop {
display:none;
text-decoration:none;
position:fixed;
bottom:10px;
right:10px;
overflow:hidden;
width:51px;
height:51px;
border:none;
text-indent:-999px;
background:url(https://blogger.googleusercontent.com/img/b/R29vZ2xl/AVvXsEjNuJnbkXZQ_AYNjKvjfRWjPx5JRty0m1Bwmn1pz533TbToOUZR7jKC21NDYm4lUM2HtgECT6sVv1ngdzc1JQvSPBBpbRfeB380Hb8yss-MVIE6fMs4xBazVdgOQsO5OX8J8YK9N9Tnk-E/s1600/ui.totop.png) no-repeat left top;
}
#toTopHover {
background:url(https://blogger.googleusercontent.com/img/b/R29vZ2xl/AVvXsEjNuJnbkXZQ_AYNjKvjfRWjPx5JRty0m1Bwmn1pz533TbToOUZR7jKC21NDYm4lUM2HtgECT6sVv1ngdzc1JQvSPBBpbRfeB380Hb8yss-MVIE6fMs4xBazVdgOQsO5OX8J8YK9N9Tnk-E/s1600/ui.totop.png) no-repeat left -51px;
width:51px;
height:51px;
display:block;
overflow:hidden;
float:left;
opacity: 0;
-moz-opacity: 0;
filter:alpha(opacity=0);
}
#toTop:active, #toTop:focus {
outline:none;
}

Note - To move the button to the left of your blog change right:10px; to left:10px; .

Step 4. Find the following piece of code in your blogs Html : (Click Ctrl and F for a search bar to help find the code - How To Find Code In Blogger Template Template)

</head>

Step 5. Now Copy And Paste This Code Directly Above / Before </head>

Note - If you have previously added jQuery script to your template you can leave out the line in green.
<script src='http://code.jquery.com/jquery-1.6.1.min.js' type='text/javascript'/>
<script src='http://suyb.googlecode.com/files/jquery.easing.1.3.js' type='text/javascript'/>
<script src='http://suyb.googlecode.com/files/jquery.ui.totop.js' type='text/javascript'/>
<script type='text/javascript'>
$(document).ready(function() {
/*
var defaults = {
containerID: &#39;moccaUItoTop&#39;, // fading element id
containerHoverClass: &#39;moccaUIhover&#39;, // fading element hover class
scrollSpeed: 1200,
easingType: &#39;linear&#39;
};
*/

$().UItoTop({ easingType: &#39;easeOutQuart&#39; });

});
</script>

Step 6. Save your template.

That's it, You can check out your new back to top button after you Comment on and Share this post ! Make sure to check out more of our jQuery Tutorials and Blogger Tips.

Drop Your Comments And Questions Below.
0

Awesome New Google Search Style Search Bar For Blogger

I'm sure you will have noticed the new Google design as covered in the post Evolving the Google design and experience on the official Google blog.While the changes have been subtle some stand out like the new sleek search bar on results pages.The new search bar has a more modern minimalist look with rounded corners and hover effect.But one new feature i quiet like is as you type your text into the search field an X appears than can be clicked to remove your text.Yes it's nothing major but still a neat feature none the less.So in this post i will show you how you can re-create the new Google search bar and use it on your blog.

Once on your blog it will look the very same, using jQuery for the X delete button and your blogs default search to generate results.This was covered on the Awesome Queness.Com design blog and with just a few changes i have it ready to go For Blogger.
Click Here To View Full Post >>
0

A Simple jQuery Powered Drop Down Menu For Blogger

I have had a lot of requests for a tutorial on creating a simple easy to use drop down menu for Blogger.There are literally thousands of drop down menus around with different styles and functions.However i want to have something that is easy to implement,add links to and Customizable.The menu i choose has all these features, a clean design with a jQuery powered drop down effect.

In the end i decided to go with a menu first published on Blogger Stop over two years ago.I simply made some small changes so it will work on the newer Template designer templates.I also added a z-index so the drop down will display over content and some Rounded corners that will be visible on browsers that support them such as Firefox, Chrome and Safari, you can see a live demo below :

View Demo Button

Add The Simple Drop Down Menu To Blogger


Remember Always Back Up Your Template Before You Make Changes - How To Back Up A Blogger Template

Step 1. In Your Blogger Dashboard Click Design > Edit Html

Design Edit Html Blogger

Step 2. Find the following piece of code in your blogs Html : (Click Ctrl and F for a search bar to help find the code - How To Find Code In Blogger Template Template)

</head>

Step 3. Copy and Paste the following code Directly Above / Before </head>

<!--start drop menu-->
<style type='text/css'>
/* menu styles */
#jsddm
{ margin: 0;
padding: 0;}

#jsddm li
{ float: left;
list-style: none;
font: 12px Tahoma, Arial}

#jsddm li a
{ display: block;
background: #0033CC; /*MENU MAIN BACKGROUND COLOR*/
-moz-border-radius: 6px;-webkit-border-radius: 6px;
padding: 5px 12px;
text-decoration: none;
border-right: 1px solid white;
width: 70px;
color: #EAFFED; /*MENU LINK COLOR*/
white-space: nowrap}

#jsddm li a:hover
{ background: #24313C /*MENU HOVER BACKGROUND COLOR*/; -moz-border-radius: 6px;-webkit-border-radius: 6px;}

#jsddm li ul
{ margin: 0;
padding: 0;
position: absolute;
z-index:100;
visibility: hidden;
border-top: 1px solid white}

#jsddm li ul li
{ float: none;
display: inline}

#jsddm li ul li a
{ width: auto;
background: #BFCFFE; /*MENU DROP DOWN BACKGROUND COLOR*/
color: #24313C /*MENU DROP DOWN LINK COLOR*/
}

#jsddm li ul li a:hover
{ background: #809FFE /*MENU DROP DOWN HOVER BACKGROUND COLOR*/}
</style>


<script src='http://ajax.googleapis.com/ajax/libs/jquery/1.2.6/jquery.min.js' type='text/javascript'/>
<script type='text/javascript'>
var timeout = 500;
var closetimer = 0;
var ddmenuitem = 0;

function jsddm_open()
{ jsddm_canceltimer();
jsddm_close();
ddmenuitem = $(this).find(&#39;ul&#39;).eq(0).css(&#39;visibility&#39;, &#39;visible&#39;);}

function jsddm_close()
{ if(ddmenuitem) ddmenuitem.css(&#39;visibility&#39;, &#39;hidden&#39;);}

function jsddm_timer()
{ closetimer = window.setTimeout(jsddm_close, timeout);}

function jsddm_canceltimer()
{ if(closetimer)
{ window.clearTimeout(closetimer);
closetimer = null;}}

$(document).ready(function()
{ $(&#39;#jsddm &gt; li&#39;).bind(&#39;mouseover&#39;, jsddm_open);
$(&#39;#jsddm &gt; li&#39;).bind(&#39;mouseout&#39;, jsddm_timer);});

document.onclick = jsddm_close;
</script>
<!--end menu code-->

Note - In yellow i have highlighted the colors used, you can change these by using a different color code.You can find the code for the colors you want with our html color code generator.

Note 2. - If the rounded corners are not to your liking remove the two sections highlighted in red and there gone !

Step 4. Save Your Template.

That's the Css and jQuery added next step is to add the html for your menu.

Now go to your blogs Design Page, we will be adding the menu across your blog below the header.This area is called Cross Column and can be seen in the image below.If your blog does not have this section available you can see how to enable it here - Add Full Width Cross Column Gadgets To Blogger.


Add The Menu Html


In your blogs Design Page click Add A Gadget > Choose Html/Javascript > Copy and paste the following code into the Html/Javascript gadget :

<ul id="jsddm">
<li><a href="/">Home</a>
<li><a href="#">Link One</a>
<ul>
<li><a href="#">Link One Sub</a></li>
</ul>
</li>
<li><a href="#">Link Two</a>
<ul>
<li><a href="#">Link Two Sub</a></li>
</ul>
</li>
<li><a href="#">Link Three</a></li>
<li><a href="#">Link Four</a></li>
<li><a href="#">Link Five</a></li>
</li></ul>

This is the code that makes up the menu in the demo.Replace the hash tags (#) with your links and the text with ehhh your text :D.If you want to add more links you can do so in the same way, take a few minutes to look at the layout of the code and you will see how it works.

Template Designer Tabs Fix


If you use a template from the Blogger Template Designer there is a section of Css that will effect this or any menu you place in the cross column section.This is called tabs and you will need to remove or over ride the tabs css.I have made a short video to show you how to remove it.You can see the video here - Remove Tabs Css.

Thanks again to BloggerStop for the original, Make sure to Check out more of our Design Tips and jQuery Tips.

Drop Your Comments And Questions Below.
0

A Cool Any Size jQuery Powered Featured Posts Slider For Blogger

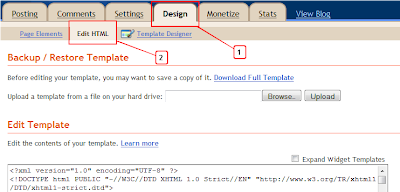
Over the last few weeks i have published some cool jQuery Gadgets and Widgets for your Blogs.In this post i have taken the jQuery Easy Slider, a stylish slide show with some neat options and turned it into a kinda mini slider with the option to go large.We previously published the Blogger jQuery Anything Slider that had the option to add videos or images as slides and a Simple But Stylish Blogger Featured Posts Slider.So i wanted to continue with a slide show that could be easily re sized from spanning the width of your blog to the miniature example i have here.

This jQuery Featured Posts Slider also has features like auto scroll, continues scroll plus next slide and previous slide buttons for manual scroll.The original Easy Slider script and code was created by the very cool Css Globe, below is a live demo of our version.

View Demo Button

As you can see i have gone small in the demo but it could be even smaller and of course much much bigger.

Add The Any Size jQuery Slider To Blogger


Remember Always Back Up Your Template Before You Make Changes - How To Back Up A Blogger Template

Step 1. In Your Blogger Dashboard Click Design > Edit Html

Design Edit Html Blogger

Step 2. Find the following piece of code in your blogs Html : (Click Ctrl and F for a search bar to help find the code - How To Find Code In A Blogger Template)

]]></b:skin>

Step 3. Copy and Paste the following code Directly Above / Before ]]></b:skin>

/*Slider Css*/
#slider{}
#slider ul, #slider li{
margin:0;
padding:0;
list-style:none;
}
#slider li{
width:320px;
height:111px;
overflow:hidden;
}
#prevBtn, #nextBtn{
display:block;
width:30px;
height:77px;
position:absolute;
left:-30px;
top:15px;
}
#nextBtn{
left:320px;
}
#prevBtn a, #nextBtn a{
display:block;
width:30px;
height:77px;
background:url(https://blogger.googleusercontent.com/img/b/R29vZ2xl/AVvXsEijLn2AsdLJiGDLzYC9Gx1d4BKERJAtKE3R1u_FZTX5PRgJo8d3RHbPuwK5KvKsvPy-GDE-8Ts5ZjFYYtbAPcJAliD1IM7NI25QkQxi9jV8Z4ayvBSHM4TiBbd7drbphCAgoc0W0UC7vls/s1600/btn_prev.gif) no-repeat 0 0;
}
#nextBtn a{
background:url(https://blogger.googleusercontent.com/img/b/R29vZ2xl/AVvXsEjKnaL-oq5nFPYQRqOqg7XMk6pCgYMuUyCnrnuo5L5SjWroDWRodX5hf7busfjtZlXcqreDwqJ2mQyP2HAqD5kDbuy-9eOgBgcZVR_QAwcsrQRcrd_fr4Avi6lES7tjQ3G7pTojd7FSoRQ/s1600/btn_next.gif) no-repeat 0 0;
}
/*Slider Css Info @ http://www.spiceupyourblog.com*/


Change the size of the slider - The width and height are highlighted in yellow so you change these to your required dimensions.You will also have to change the position of the next and previous buttons which is a little more tricky.

Highlighted in red you can see i have the buttons 15px from the top, if you made the slider bigger you would increase the margin from the top.So for example if you made the slider 222px high you would make this 30px.You can try a few margins until you get it right.

Step 4. Find the following piece of code in your blogs Html : (Click Ctrl and F for a search bar to help find the code - How To Find Code In A Blogger Template)

</head>

Step 5. Now Copy And Paste This Code Directly Above / Before </head>

Note - If you have previously added jQuery to your template you can leave out the section in green.
<script src='https://ajax.googleapis.com/ajax/libs/jquery/1.6.1/jquery.min.js' type='text/javascript'/>
<script src='http://suyb.googlecode.com/files/easySlider1.7.js-blogger.js'/>
<script>
$(document).ready(function(){
$(&quot;#slider&quot;).easySlider({
auto: true,
continuous: true
});
});
</script>

That's the Css and Script added for the slider now we add the Html for the actual images.

The Html, Links And Images


This is the html for the actual slider in the demo blog, you can see the links and images highlighted.You can copy and paste this code into a Html / Javascript gadget from your design page, add your links then save and drag and drop into position.

<div id="slider"> <ul>

<li><a href="http://www.spiceupyourblog.com"><img src="https://blogger.googleusercontent.com/img/b/R29vZ2xl/AVvXsEg_QXVXftmcm6xf-Qfua66Vppb03ud3xsn4YecVWSTLoXsLcS-CSU5hrPNS2s_-YfdmG7sUTwQhruF1cpjibLm5gxkSVgsA2X-PUrGZszd02Yz1rK4RET5i3j7zOfd0HFbiENyZ6DZsRjY/s320/01.jpg" width="320px" height="111px" /></a></li>

<li><a href="http://www.bestbloggertemplates.net"><img src="https://blogger.googleusercontent.com/img/b/R29vZ2xl/AVvXsEi74uRFfx4rWhWRSi8t_9BuwHpAhZZbbTcP9m-AcvwuqjW13Y7Za_PAg1AwhAqHLOY59NbNgwO-ftvV_TfJw0r6FUEaqd5TP3LcMTVfiJHUbtRqTantwqqtu_bSccfWnlDqisf7g_YaxFQ/s320/02.jpg" width="320px" height="111px"/></a></li>

<li><a href="http://www.socialiconstudio.com"><img src="https://blogger.googleusercontent.com/img/b/R29vZ2xl/AVvXsEg2peOSIp6oWRWvywgs0dhh_xri2N9FOEoTkK1f985xsiER127SZor6x6gpyk12AVQCNGezIqctJCbxBSA6qmSF6d-JmZUDigZnowN1_rlwletgU6hQ2iAC0Q30YNqOs0VkONjLKdFACWk/s320/03.jpg" width="320px" height="111px" /></a></li>

<li><a href="http://www.spiceupyourblog.com"><img src="https://blogger.googleusercontent.com/img/b/R29vZ2xl/AVvXsEjmJFS7Os1fwmtfe__WM16Q70N7-42Zpo6TzUv0M7_yNASbTamVIKli1uD1rsW0hyphenhyphentxUWZFX-tytgsyF-LfskonNGs-9Eb3fmZzKHWya22Lz3OdaTLc1VSBDmtGudWbdegB35lCBha5HNE/s320/04.jpg" width="320px" height="111px" /></a></li>

<li><a href="http://www.bestbloggertemplates.net"><img src="https://blogger.googleusercontent.com/img/b/R29vZ2xl/AVvXsEhxerU4zAtBfhMx7kOuEBphFQvKGJDcOAwxOyrS9rJZ03ohZtD3QaKUFxbL1zvl1BpVtk9Ug1muaCfb1EQzknMPUCUM48QT7smg6Bj5erbJrPWDFAAcKgKr_oUrFGTAoHao_k1e_f-XK-k/s320/05.jpg" width="320px" height="111px" /></a></li>

</ul>
</div>
Note - The links are in yellow and the image URLs in red, change these to your links and images.

Note 1 - If you do change the size of the slider you need to change the width and height in each slide above to the same dimensions.

Add More Slides - To add more slides you simply add another link and image like this after the <ul> tag above :

<li><a href="http://www.bestbloggertemplates.net"><img src="https://blogger.googleusercontent.com/img/b/R29vZ2xl/AVvXsEhxerU4zAtBfhMx7kOuEBphFQvKGJDcOAwxOyrS9rJZ03ohZtD3QaKUFxbL1zvl1BpVtk9Ug1muaCfb1EQzknMPUCUM48QT7smg6Bj5erbJrPWDFAAcKgKr_oUrFGTAoHao_k1e_f-XK-k/s320/05.jpg" width="320px" height="111px" /></a></li>

That's it for the versatile jQuery Easy Slider and this Blogger Tip.Once again thanks to Css Globe, and make sure to check out more of our jQuery Gadgets and Blogger Gadgets.

Drop Your Comments And Questions Below.
0

16 Best Free Blogger Templates Featuring Amazing jQuery Featured Slideshows

One of the popular features of Blogger Blogspot Templates is the Featured Post Slider or Slideshow Carousal.Not too long ago a very plain Image Slider was the best you could hope for and you were lucky to even get that.However now with so many awesome Free Blogger Templates and Designers creating templates and converting Css and Wordpress Themes to Blogger the options are fantastic.We constantly see templates of premium quality with stunning Image Sliders available for free download.In this post i will list 16 of the Best Blogger Templates With Featured Post Sliders, Image Sideshows and Picture Carousals.All the Sliders are created with jQuery which allows some cool features such as the transitions  (The effect between each slide).

So in no particular order here is the list !
Click Here To View Full Post >>
0

Beautiful jQuery Lavalamp Floating Bubble Menu For Blogger In 6 Styles

Blogger jquery menuI recently realised i had not covered navigation menus too much in our Blogger Tips on Spice Up Your Blog.I Guess most custom templates already have a menu and templates from the template designer have tabs enabled which will turn a link list or page list into a menu.However i knew i wanted to cover the jQuery lava lamp or floating bubble menu as it is seriously cool, interactive and i have not seen it on any Blogger blog.The lava lamp menu has an effect you may have seen on other websites, a bubble is visible behind the first link title (Usually Home) on the menu and when you place your cursor over another link title the bubble slides up to that link.It looks awesome and as ever the use of jQuery makes it possible and smooth.As an extra bonus we have this effect added to 6 different color styles of menu you can quickly add to your blog !
Click Here To View Full Post >>
0

Blogger And Wordpress Spectacular jQuery Image Zoom Effect

jQuery Zoom For Blogger ImagesA few weeks ago i published a very popular post featuring an Amazing jQuery Image Zoom For Blogger.That effect allowed you to display an in dept zoom in a container beside images.In this post we have the same in dept zoom but this time it appears within the image in whats called inner zoom.So if you uploaded an image to your blog that's displayed 200x200 pixels the zoom appears within that space.Lets look at the demo so you can try it out.
Click Here To View Full Post >>
0

The Awesome Complete Animated Sexy Social Bookmarks V3 For Blogger

The Sexy Bookmarks range so called as the very first gadget had the 'Sharing Is Sexy' message is probably the most eye catching Bookmarking Widget available.On Spice Up Your Blog i have covered a few versions and even used the Arrow Messages to create my own unique versions.However in this post i have the complete sexy bookmarks range with the awesome accordion auto hide and all 8 arrow messages.With the accordion effect one row of icons are visible and on hover the page drops to display 48 more sharing options, that's 56 in total.The icons themselves are sprites with a pop up effect, all making for a totally animated look using jQuery.Best of all by changing just one line in the you can use any of the 8 messages.The message and icons are all transparent so work on any background color.We will be adding the sexy bookmarks gadget directly below all you your posts.

I have 2 demos showing the sexy bookmarks in action, one on a light background and one on a dark background.The demo has all 8 gadgets make sure to hover over the icons to see the drop down for the other icons.

Light Background Sexy Bookmarks Demo

Dark Background Sexy Bookmarks Demo

Very Cool Eh ! This version is the most complete i have seen for Blogger and thanks go to Harish from Way2Blogging and Custom Blogger Templates.Harish also works with me on projects in the Hire Us section of Spice Up Your Blog.

The arrow messages available are Sharing Is Sexy, Sharing Is Caring, Sharing Is Caring With Hearts, Share The Love, Share The Wealth, Share And Enjoy, Share The Knowledge and even an arrow message in German !

The Bookmarking Icons In The Gadget are for Twitter, Facebook, Linkedin, Stumble Upon, Delicious, Digg, Google Buzz, Blogger, Yahoo Mail, Gmail, Google Bookmarks, Google Reader, Rss, Orkut, Design Bump, Reddit, Design Float, Friend Feed, Dzone, Web Blend, Propeller, Tumblr, Squidoo, Posterous, Technorati, Bebo, Hotmail, Blinklist, Blog Engage, Blog Marks, Box.Net, Current, Diigo, Ekudos, Evernote, Hacker News, Hives, Identica, Jumptags, Email, Meneame, Mister Wong, My Link Vault, Myspace, Netvibes, Netvouz, Newsvine, Ning, Ping FM, Plaxo, Plurk, Print Friendly, Slashdot, Sphinn, Techmeme and Tipd.

OK lets add it to your blog.

Add The V3 Complete Sexy Bookmarks Gadget To Your Blog


Step 1. In Your Blogger Dashboard Click Design > Edit Html > Tick The Expand Widget Templates Box

Design Edit Html Widget Templates

Step 2. Find the following piece of code in your blogs Html : (Click Ctrl and F for a search bar to help find the code - More Info)

</head>

Step 3. Copy and Paste the following code directly Above / Before </head>

-If you previously added jQuery to your blog you can remove the line in yellow.

<script src='http://ajax.googleapis.com/ajax/libs/jquery/1.5.0/jquery.min.js'
type='text/javascript' />
<link href='http://bloggerblogwidgets.googlecode.com/svn/trunk/auto-hide-social-bookmarking-way2blogging.css'
rel='stylesheet' type='text/css' />
<script type="text/javascript">
jQuery(document).ready(function() {
jQuery('.sexy-bookmarks a.external').attr("target", "_blank");
var sexyBaseHeight = jQuery('.sexy-bookmarks').height();
var sexyFullHeight = jQuery('.sexy-bookmarks ul.socials').height();
if (sexyFullHeight > sexyBaseHeight) {
jQuery('.sexy-bookmarks-expand').hover(

function() {
jQuery(this).animate({
height: sexyFullHeight + 15 + 'px'
}, {
duration: 800,
queue: false
});
}, function() {
jQuery(this).animate({
height: sexyBaseHeight + 'px'
}, {
duration: 800,
queue: false
});
});
}
if (jQuery('.sexy-bookmarks-center')) {
var sexyFullWidth = jQuery('.sexy-bookmarks').width();
var sexyBookmarkWidth = jQuery('.sexy-bookmarks:first ul.socials li').width();
var sexyBookmarkCount = jQuery('.sexy-bookmarks:first ul.socials li').length;
var numPerRow = Math.floor(sexyFullWidth / sexyBookmarkWidth);
var sexyRowWidth = Math.min(numPerRow, sexyBookmarkCount) * sexyBookmarkWidth;
var sexyLeftMargin = (sexyFullWidth - sexyRowWidth) / 2;
jQuery('.sexy-bookmarks-center').css('margin-left', sexyLeftMargin + 'px');
}
});
</script>


Step 4. Find the following piece of code in your blogs Html : (Click Ctrl and F for a search bar to help find the code - More Info)

<div class='post-footer'>

- If you cant find this use <data:post.body/>
instead.

Step 5. Copy and Paste the following code Directly Below / Under <div class='post-footer'>

<!--start bookmarks sexy-->
<b:if cond='data:blog.pageType == &quot;item&quot;'>
<div id='post-width-w2b' style='width:550px;'>
<div class='sexy-bookmarks-bg-sexy sexy-bookmarks sexy-bookmarks-expand sexy-bookmarks-center '>
<ul class='socials'>
<li class='sexy-twitter'>
<a class='external' expr:href='&quot;http://twitter.com/home?status=&quot; + data:post.title + &quot; -- &quot; + data:post.url ' rel='nofollow' title='Tweet This!'/>
</li>
<li class='sexy-facebook'>
<a class='external' expr:href='&quot;http://www.facebook.com/share.php?v=4&amp;src=bm&amp;u=&quot; + data:post.url + &quot;&amp;t=&quot; + data:post.title ' onclick='window.open(this.href,&apos;sharer&apos;,&apos;toolbar=0,status=0,width=626,height=436&apos;); return false;' rel='nofollow' title='Share this on Facebook'/>
</li>
<li class='sexy-linkedin'>
<a class='external' expr:href='&quot;http://www.linkedin.com/shareArticle?mini=true&amp;url=&quot; + data:post.url + &quot;&amp;title=&quot; + data:post.title + &quot;&amp;summary=&amp;source=&quot;' rel='nofollow' title='Share this on LinkedIn'/>
</li>
<li class='sexy-stumbleupon'>
<a class='external' expr:href='&quot;http://www.stumbleupon.com/submit?url=&quot; + data:post.url + &quot;&amp;title=&quot; + data:post.title ' rel='nofollow' title='Stumble upon something good? Share it on StumbleUpon'/>
</li>
<li class='sexy-delicious'>
<a class='external' expr:href='&quot;http://delicious.com/post?url=&quot; + data:post.url + &quot;&amp;title=&quot; + data:post.title ' rel='nofollow' title='Share this on del.icio.us'/>
</li>
<li class='sexy-digg'>
<a class='external' expr:href='&quot;http://digg.com/submit?phase=2&amp;url=&quot; + data:post.url + &quot;&amp;title=&quot; + data:post.title ' rel='nofollow' title='Digg this!'/>
</li>
<li class='sexy-googlebuzz'>
<a class='external' expr:href='&quot;http://www.google.com/buzz/post?url=&quot; + data:post.url + &quot;&amp;imageurl=&quot;' rel='nofollow' title='Post on Google Buzz'/>
</li>
<li class='sexy-blogger'>
<a class='external' expr:href='&quot;http://www.blogger.com/blog_this.pyra?t&amp;u=&quot; + data:post.url + &quot;&amp;n=&quot; + data:post.title + &quot;&amp;pli=1&quot;' rel='nofollow' title='Blog this on Blogger'/>
</li>
<li class='sexy-yahoomail'>
<a class='external' expr:href='&quot;http://compose.mail.yahoo.com/?Subject= &quot; + data:post.title + &quot;&amp;body=Link:&quot;+ data:post.url' rel='nofollow' title='Email this via Yahoo! Mail'/>
</li>
<li class='sexy-gmail'>
<a class='external' expr:href='&quot;https://mail.google.com/mail/?ui=2&amp;view=cm&amp;fs=1&amp;tf=1&amp;su=&quot; + data:post.title + &quot;&amp;body=Link:&quot; + data:post.url' rel='nofollow' title='Email this via Gmail'/>
</li>
<li class='sexy-googlebookmarks'>
<a class='external' expr:href='&quot;http://www.google.com/bookmarks/mark?op=add&amp;bkmk=&quot; + data:post.url + &quot;&amp;title=&quot; + data:post.title ' rel='nofollow' title='Add this to Google Bookmarks'/>
</li>
<li class='sexy-googlereader'>
<a class='external' expr:href='&quot;http://www.google.com/reader/link?url=&quot; + data:post.url + &quot;&amp;title=&quot; + data:post.title + &quot;&amp;srcUrl=&quot; + data:post.url + &quot;&amp;srcTitle=&quot; + data:post.title + &quot;&amp;snippet=&quot;' rel='nofollow' title='Add this to Google Reader'/>
</li>
<li class='sexy-comfeed'>
<a class='external' expr:href='data:blog.homepageUrl + &quot;feeds/&quot; + data:post.id + &quot;/comments/default?alt=rss&quot;' rel='nofollow' title='Subscribe to the comments for this post?'/>
</li>
<li class='sexy-orkut'>
<a class='external' expr:href='&quot;http://promote.orkut.com/preview?nt=orkut.com&amp;tt=&quot; + data:post.title + &quot;&amp;du=&quot; + data:post.url + &quot;&amp;cn=&quot;' rel='nofollow' title='Promote this on Orkut'/>
</li>
<li class='sexy-designbump'>
<a class='external' expr:href='&quot;http://designbump.com/submit?url=&quot; + data:post.url + &quot;&amp;title=&quot; + data:post.title + &quot;&amp;body=&quot;' rel='nofollow' title='Bump this on DesignBump'/>
</li>
<li class='sexy-reddit'>
<a class='external' expr:href='&quot;http://reddit.com/submit?url=&quot; + data:post.url + &quot;&amp;title=&quot; + data:post.title ' rel='nofollow' title='Share this on Reddit'/>
</li>
<li class='sexy-designfloat'>
<a class='external' expr:href='&quot;http://www.designfloat.com/submit.php?url=&quot; + data:post.url + &quot;&amp;title=&quot; + data:post.title ' rel='nofollow' title='Submit this to DesignFloat'/>
</li>
<li class='sexy-friendfeed'>
<a class='external' expr:href='&quot;http://www.friendfeed.com/share?title=&quot; + data:post.title + &quot;&amp;link=&quot; + data:post.url ' rel='nofollow' title='Share this on FriendFeed'/>
</li>
<li class='sexy-dzone'>
<a class='external' expr:href='&quot;http://www.dzone.com/links/add.html?url=&quot; + data:post.url + &quot;&amp;title=&quot; + data:post.title + &quot;&amp;description=&quot;' rel='nofollow' title='Add this to DZone'/>
</li>
<li class='sexy-webblend'>
<a class='external' expr:href='&quot;http://thewebblend.com/submit?url=&quot; + data:post.url + &quot;&amp;title=&quot; + data:post.title + &quot;&amp;body=&quot;' rel='nofollow' title='Blend this!'/>
</li>
<li class='sexy-propeller'>
<a class='external' expr:href='&quot;http://www.propeller.com/submit/?url=&quot; + data:post.url ' rel='nofollow' title='Submit this story to Propeller'/>
</li>
<li class='sexy-tumblr'>
<a class='external' expr:href='&quot;http://www.tumblr.com/share?v=3&amp;u=&quot; + data:post.url + &quot;&amp;t=&quot; + data:post.title ' rel='nofollow' title='Share this on Tumblr'/>
</li>
<li class='sexy-squidoo'>
<a class='external' expr:href='&quot;http://www.squidoo.com/lensmaster/bookmark?&quot; + data:post.url ' rel='nofollow' title='Add to a lense on Squidoo'/>
</li>
<li class='sexy-posterous'>
<a class='external' expr:href='&quot;http://posterous.com/share?linkto=&quot; + data:post.url + &quot;&amp;title=&quot; + data:post.title + &quot;&amp;selection=&quot;' rel='nofollow' title='Post this to Posterous'/>
</li>
<li class='sexy-technorati'>
<a class='external' expr:href='&quot;http://technorati.com/faves?add=&quot; + data:post.url ' rel='nofollow' title='Share this on Technorati'/>
</li>
<li class='sexy-hotmail'>
<a class='external' expr:href='&quot;http://mail.live.com/?rru=compose?subject=&quot; + data:post.title + &quot;&amp;body=Link: &quot; + data:post.url ' rel='nofollow' title='Email this via Hotmail'/>
</li>
<li class='sexy-bebo'>
<a class='external' expr:href='&quot;http://www.bebo.com/c/share?Url=&quot; + data:post.url + &quot;&amp;Title=&quot; + data:post.title ' rel='nofollow' title='Share this on Bebo'/>
</li>
<li class='sexy-blinklist'>
<a class='external' expr:href='&quot;http://www.blinklist.com/index.php?Action=Blink/addblink.php&amp;Url=&quot; + data:post.url + &quot;&amp;Title=&quot; + data:post.title ' rel='nofollow' title='Share this on Blinklist'/>
</li>
<li class='sexy-blogengage'>
<a class='external' expr:href='&quot;http://www.blogengage.com/submit.php?url=&quot; + data:post.url ' rel='nofollow' title='Engage with this article!'/>
</li>
<li class='sexy-blogmarks'>
<a class='external' expr:href='&quot;http://blogmarks.net/my/new.php?mini=1&amp;simple=1&amp;url=&quot; + data:post.url + &quot;&amp;title=&quot; + data:post.title ' rel='nofollow' title='Mark this on BlogMarks'/>
</li>
<li class='sexy-boxnet'>
<a class='external' expr:href='&quot;https://www.box.net/api/1.0/import?url=&quot; + data:post.url + &quot;&amp;name=&quot; + data:post.title + &quot;&amp;description=&amp;import_as=link&quot;' rel='nofollow' title='Add this link to Box.net'/>
</li>
<li class='sexy-current'>
<a class='external' expr:href='&quot;http://current.com/clipper.htm?url=&quot; + data:post.url + &quot;&amp;title=&quot; + data:post.title ' rel='nofollow' title='Post this to Current'/>
</li>
<li class='sexy-diigo'>
<a class='external' expr:href='&quot;http://www.diigo.com/post?url=&quot; + data:post.url + &quot;&amp;title=&quot; + data:post.title + &quot;&amp;desc=&quot;' rel='nofollow' title='Post this on Diigo'/>
</li>
<li class='sexy-ekudos'>
<a class='external' expr:href='&quot;http://www.ekudos.nl/artikel/nieuw?url=&quot; + data:post.url + &quot;&amp;title=&quot; + data:post.title + &quot;&amp;desc=&quot;' rel='nofollow' title='Submit this to eKudos'/>
</li>
<li class='sexy-evernote'>
<a class='external' expr:href='&quot;http://www.evernote.com/clip.action?url=&quot; + data:post.url + &quot;&amp;title=&quot; + data:post.title ' rel='nofollow' title='Clip this to Evernote'/>
</li>
<li class='sexy-hackernews'>
<a class='external' expr:href='&quot;http://news.ycombinator.com/submitlink?u=&quot; + data:post.url + &quot;&amp;t=&quot; + data:post.title ' rel='nofollow' title='Submit this to Hacker News'/>
</li>
<li class='sexy-hyves'>
<a class='external' expr:href='&quot;http://www.hyves.nl/profilemanage/add/tips/?name=&quot; + data:post.title + &quot;&amp;text=Text about this site+-+&quot; + data:post.url + &quot;&amp;rating=5&quot;' rel='nofollow' title='Share this on Hyves'/>
</li>
<li class='sexy-identica'>
<a class='external' expr:href='&quot;http://identi.ca//index.php?action=newnotice&amp;status_textarea=Reading:&quot; + data:post.title + &quot;+-+from+&quot; + data:post.url ' rel='nofollow' title='Post this to Identica'/>
</li>
<li class='sexy-jumptags'>
<a class='external' expr:href='&quot;http://www.jumptags.com/add/?url=&quot; + data:post.url + &quot;&amp;title=&quot; + data:post.title ' rel='nofollow' title='Submit this link to JumpTags'/>
</li>
<li class='sexy-mail'>
<a class='external' expr:href='&quot;mailto:?subject=%22&quot; + data:post.title + &quot;%22&amp;body=Link: &quot; + data:post.url + &quot; (sent via Way2blogging) &quot;' rel='nofollow' title='Email this to a friend?'/>
</li>
<li class='sexy-meneame'>
<a class='external' expr:href='&quot;http://meneame.net/submit.php?url=&quot; + data:post.url ' rel='nofollow' title='Submit this to Meneame'/>
</li>
<li class='sexy-misterwong'>
<a class='external' expr:href='&quot;http://www.mister-wong.com/addurl/?bm_url=&quot; + data:post.url + &quot;&amp;bm_description=&quot; + data:post.title + &quot;&amp;plugin=sexybookmarks&quot;' rel='nofollow' title='Add this to Mister Wong'/>
</li>
<li class='sexy-mylinkvault'>
<a class='external' expr:href='&quot;http://www.mylinkvault.com/link-page.php?u=&quot; + data:post.url + &quot;&amp;n=&quot; + data:post.title ' rel='nofollow' title='Store this link on MyLinkVault'/>
</li>
<li class='sexy-myspace'>
<a class='external' expr:href='&quot;http://www.myspace.com/Modules/PostTo/Pages/?u=&quot; + data:post.url + &quot;&amp;t=&quot; + data:post.title ' rel='nofollow' title='Post this to MySpace'/>
</li>
<li class='sexy-netvibes'>
<a class='external' expr:href='&quot;http://www.netvibes.com/share?title=&quot; + data:post.title + &quot;&amp;url=&quot; + data:post.url ' rel='nofollow' title='Submit this to Netvibes'/>
</li>
<li class='sexy-netvouz'>
<a class='external' expr:href='&quot;http://www.netvouz.com/action/submitBookmark?url=&quot; + data:post.url + &quot;&amp;title=&quot; + data:post.title + &quot;&amp;popup=no&quot;' rel='nofollow' title='Submit this to Netvouz'/>
</li>
<li class='sexy-newsvine'>
<a class='external' expr:href='&quot;http://www.newsvine.com/_tools/seed&amp;save?u=&quot; + data:post.url + &quot;&amp;h=&quot; + data:post.title ' rel='nofollow' title='Seed this on Newsvine'/>
</li>
<li class='sexy-ning'>
<a class='external' expr:href='&quot;http://bookmarks.ning.com/addItem.php?url=&quot; + data:post.url + &quot;&amp;T=&quot; + data:post.title ' rel='nofollow' title='Add this to Ning'/>
</li>
<li class='sexy-pingfm'>
<a class='external' expr:href='&quot;http://ping.fm/ref/?link=&quot; + data:post.url + &quot;&amp;title=&quot; + data:post.title + &quot;&amp;body=&quot;' rel='nofollow' title='Ping this on Ping.fm'/>
</li>
<li class='sexy-plaxo'>
<a class='external' expr:href='&quot;http://www.plaxo.com/?share_link=&quot; + data:post.url ' rel='nofollow' title='Share this on Plaxo'/>
</li>
<li class='sexy-plurk'>
<a class='external' expr:href='&quot;http://www.plurk.com/m?content=9+beautiful+web+forms+for+free+download+-+&quot; + data:post.url + &quot;&amp;qualifier=shares&quot;' rel='nofollow' title='Share this on Plurk'/>
</li>
<li class='sexy-printfriendly'>
<a class='external' expr:href='&quot;http://www.printfriendly.com/print?url=&quot; + data:post.url ' rel='nofollow' title='Send this page to Print Friendly'/>
</li>
<li class='sexy-slashdot'>
<a class='external' expr:href='&quot;http://slashdot.org/bookmark.pl?url=&quot; + data:post.url + &quot;&amp;title=&quot; + data:post.title ' rel='nofollow' title='Submit this to SlashDot'/>
</li>
<li class='sexy-sphinn'>
<a class='external' expr:href='&quot;http://sphinn.com/index.php?c=post&amp;m=submit&amp;link=&quot; + data:post.url ' rel='nofollow' title='Sphinn this on Sphinn'/>
</li>
<li class='sexy-techmeme'>
<a class='external' expr:href='&quot;http://twitter.com/home/?status=Tip+@Techmeme+&quot; + data:post.url + &quot;--&quot; + data:post.title + &quot;&amp;source=Way2blogging&quot;' rel='nofollow' title='Tip this to TechMeme'/>
</li>
<li class='sexy-tipd'>
<a class='external' expr:href='&quot;http://tipd.com/submit.php?url=&quot; + data:post.url ' rel='nofollow' title='Share this on Tipd'/>
</li>
<li class='sexy-way2blogging'>
<a class='external' href='http://way2blogging.blogspot.com' rel='follow' title='Grab this Widget'/>
</li>
<li class='sexy-way2blogging'>
<a class='external' href='http://www.spiceupyourblog.com' rel='follow' title='Social Bookmarking Gadgets'/>
</li>
</ul>
<div class='sexy-link'>
Widget for blogger by <a href='http://way2blogging.blogspot.com/2010/12/add-sexy-auto-hide-social-bookmarking.html' rel='follow' title='Grab this Widget'>Way2Blogging</a> | Via <a href='http://www.spiceupyourblog.com/2011/05/awesome-complete-animated-sexy-social.html' rel='follow' title='Blogger Bookmarking Gadgets'>Spice Up Your Blog Gadgets</a>
</div>
</div>
</div>
</b:if>
<!--end bookmarks-->

The Options

The line in red at the top sets the gadget to only be displayed on full posts pages not on the home page.To display the gadget on your home page also remove the line in red and Important if you look the the bottom of the code you will see </b:if> in red, this is the closing tag so remove this also.

The width is highlighted in blue at 550px and can be changed to suit your blog.

Change The Arrow Message

To change the arrow message simple change the line highlighted in yellow above with one of the lines below.Currently the message is Sharing Is Sexy.

Sharing Is Sexy Bookmark Arrow Message

sexy-bookmarks-bg-sexy

Sharing Is Caring Hearts Bookmark Arrow Message

sexy-bookmarks-bg-caring

Sharing Is Caring Bookmark Arrow Message

sexy-bookmarks-bg-caring-old

Share The Love Bookmark Arrow Message

sexy-bookmarks-bg-love

Share The Wealth Bookmark Arrow Message

sexy-bookmarks-bg-wealth

Share And Enjoy Bookmark Arrow Message

sexy-bookmarks-bg-enjoy

Share The Knowledge Bookmark Arrow Message

sexy-bookmarks-bg-knowledge

German Bookmark Arrow Message

sexy-bookmarks-bg-german

How about a different message every day ?

And that the awesome Sexy Bookmarks with all the options.Once again all thanks go to Way2Blogging make sure to check out Harish's Blog.Also if you use Wordpress check out the original Wordpress Plugin by Shareaholic.Here on SUYB we have lots more Social Bookmarking Gadgets including my unique versions of Sexy Bookmarks.

Drop Your Comments And Questions Below.
0

jQuery Lightbox Image Overlay Pop Out Effect For Blogger

jQuery Lightbox Image OverlayRecently we have been looking at the images you use in your blog and making them display better and more interactive.This has included an Image Zoom Effect and Featured Image Slideshow.In this post we will cover perhaps the more popular image plugin.The lightbox plugin really is a 'Must Have' for blogs that use pictures in their posts.At the moment when a user clicks on an image you uploaded on your blog they click through to the image URL page which is just the image on a blank page.With this lightbox effect when your images are clicked they smoothly pop up into a container in full size with an optional description.If you have the effect added to more than one image users will have the option to scroll through each with next previous buttons.Lets look at some Demos.

While testing this i had to make a few demos so i kept two for you to check out, just click on the images in the demo posts.You will see the next and previous buttons when you hover over the image when popped out.
Click Here To View Full Post >>
0

A Simple Stylish jQuery Featured Slideshow For Blogger

Earlier this week i brought you a very cool jQuery Featured Image Slider that can slide images and videos.In that post i explained how  i hadn't covered featured sliders or slideshows too much but was gonna make up for it.So here we have another featured slider slash slideshow slash image carousel.The slideshow in this post has a simple style but that gives us some extra options, the main one is you can easily make it any size to suit your blog or the images you want to use.

In the demo i have made it quiet small so it will fit above the posts section.But you can have it fit neatly above your posts or you can have it span across your full blog in the cross column zone.
Click Here To View Full Post >>
0

Create A Link To A Point On The Same Page And Add jQuery For Scroll Effect

We all add links to different pages both within our blogs and externally to other sites.But what about creating a link within a page, a link from one point on a page to another.This is something i often see in Help or FAQ pages, a list of the most common questions and you click on the question to jump to the answer.This way of linking within a page is actually very simple and nothing needs to be added to your template for it to work.In this post i will show you how to quickly create a simple link within pages on your blog.But as a bonus i will also show you how some jQuery can make the transition between the link and the point it leads to less of a jump and more of leisurely scroll.
Click Here To View Full Post >>
0

Amazing Blogger jQuery Anything Slider Slides Images And Videos

Featured Sliders also known as Slideshows, Image Sliders, Featured Posts Sliders and Carousels are very popular among bloggers.They can be used to link to featured content in your blog or just as an image carousel for your pictures.I have not really covered sliders or slideshows too much on Spice Up Your Blog.The main reason is there are so many tutorials already available for Blogger sliders, i did share 5 of my favorite Blogger Featured Sliders from other blogs not too long ago.
Click Here To View Full Post >>
0

An Amazing jQuery Image Zoom Effect For Blogger

Many of the latest posts have been looking at Css effects and Image effects so in this post we will continue with the images but bring some jQuery into the mix.If your a beginner thinking whats he talking about don't worry we will have all the steps set up for simple copy and paste.The effect we will achieve in this post is very cool.When you add an image to your blog you can allow users to hover over that image and a larger version appears.Users can then move the cursor around the small image and see it zoomed.The demo below will show you exactly how it works.


View Demo Button

Click Here To View Full Post >>
0

jQuery Animated Welcome Message For Blogger

blogger blog welcomeOne of the popular plugins for Wordpress blogs is the Blog Welcome Message which is displayed above or below the post titles on blogs.In this post i will show you how to add a similar welcome message to Blogger.The Blog welcome message uses an animated effect, it fades in and out when the reader first lands on your page to grab their attention.You can add any text to the message along with a thumbnail image, also readers can collapse and hide the message.I have created three welcome messages you can use and i will show you how to add them to your blog.I will also show you how to edit every part of the message like text, colors, image and more.

I have created 3 samples to give you an idea of how you can use the message on your blog.

Working Demo 1 - See a demo of a Rss Feed welcome message above post titles Here

Working Demo 2 - See a demo of a Twitter Welcome message below post titles Here

Working demo 3 - See a demo of a Facebook Welcome message below posts Here

Adding The Welcome Message To Blogger

Rss Feed Welcome Message - Below is the message with the Rss Feed link, you can use this message and simply change the feed link to yours.Instructions are below to completely change the message and use another image and different text.

<b:if cond='data:blog.pageType == &quot;item&quot;'>
<a href='http://www.spiceupyourblog.com'><img alt='Best Blogger Tips' src='https://blogger.googleusercontent.com/img/b/R29vZ2xl/AVvXsEhXwDQBkV-dP7LhydxyuxCOyhOTRw_6jtGHxR0_MtA9n_IuR4Fp2ZZ1KSoVo1tFQoDaSGMEYUeuPBUUA1-8YVoXRmqjHEsMNDgjiBZf9cqVbslomIFuB4irXi45b_YW4LTKRwKcmM5CAV0P/s1600/best+blogger+tips.png'/></a><style>

#info{

border: 1px solid;

margin: 10px 0px;

padding:15px 10px 15px 50px;

background-repeat: no-repeat;

background-position: 10px center;

position:relative;

color: #00529B;

background-color: #BDE5F8;

background-image: url('https://blogger.googleusercontent.com/img/b/R29vZ2xl/AVvXsEi1iuKqVrzppelFE00yctJTYaOOb9e2RZ2WvKfeceQ2rO0iDJFzjcTLwpYjRtLCBdMBzzAerjdFY-SMu2FF_9KW-nc7894jLPfC_k05Q1ReG4CjmvIy3r3TyKjsUPsD7n-RlDa40H4lqSbF/s1600/rss-mini.png');

}

</style><script src="http://code.jquery.com/jquery-1.2.3.min.js" type="text/javascript">

</script>


<script type="text/javascript">

$(document).ready(function(){

$(".close").click(function(){

$("#info").animate({left:"+=10px"}).animate({left:"-5000px"});

});

$("#info").fadeOut(800).fadeIn(800).fadeOut(400).fadeIn(400)

.fadeOut(400).fadeIn(400);

});


</script>

<div id="info">

<a class="close" href="#close" style="float: right;"><img border="0" src="https://blogger.googleusercontent.com/img/b/R29vZ2xl/AVvXsEiQa60zyiHtD_VNyCZWV2A0NDS-z59FE4nHDlMmWMGEO5rg_80Ic0ID8rrHhhqgXRrY59MSZE5vmqgJHFSnFUjWi3eaGSHM7cE51luEmNge-GdiRdbgnAsQ7lWV6bqI0aKbtCvRBc6sh2tD/s1600/close+message.png" /></a>

<center><b>Welcome</b> - If Your New Here You Wont Want To Miss Another Article.<br />Why Not Subscribe To Our <a href="http://feeds2.feedburner.com/spiceupyourblog" target="_blank"><b>Rss Feed</b></a> !</center></div>
</b:if>

*To change the Rss Mini image replace the Image URL in red.
*The code in orange is the Text Message and Rss link replace them with your own message and image.
*Change the text color edit - color: #00529B;
*Change the background color edit - background-color: #BDE5F8;
Get color codes here - Color Code Generator

Images from demos - If you want to use the facebook or Twitter images from the demos here are the codes :


https://blogger.googleusercontent.com/img/b/R29vZ2xl/AVvXsEgCb4N1m2qfbSJHl90qA4CodSqXulZ55P04FOhb8juehDS_nZef0_9WGfGpW95xRUOUd6SeE0s6798ddFg0rwl7AKl94dwJsqnlae8TAcIxoM-KXFnhqftjawQK0OZcORqdAuM242IVH8TJ/s1600/fb-mini.png

https://blogger.googleusercontent.com/img/b/R29vZ2xl/AVvXsEh5Q5b50qs8CErr2-uBeuqxGT9GCmJat60HAn9CmePD-XphFZA5PovuEIw5rwPyzn5xvhIikcUWuVpuB34DSGElL8rqr84Yp_TMyqaHgPj_q-5XB0IrBWWDUJfz10DP0upzs-RY-LTlR1ja/s1600/twitter-mini.png

OK so you have the code for your message lets add it to your blog !

How To Add Message To Blogger

Add Message Above Posts

Step 1. In your dashboard click 'Design' > 'Add A Gadget'


Step 2. From the pop up menu choose Html/Javascript


Step 3. Paste the code for your message into the Html/Javascript area and save.Now drag the gadget to the area above the posts as shown below.

Add Message Below Post Titles

Step 1. In your dashboard click 'Design' > 'Edit Html' > Tick the 'Expand Widget Templates' box.


Step 2. Find the following piece of code in your blogs Html : (Click Ctrl and F for a search bar to help find the code - More Info)

<div class='post-header-line-1'/>

Step 3. Paste you message code Directly Below <div class='post-header-line-1'/>

Save your template.

That's it you have a cool welcome message to greet visitors to your blog and hopefully get some subscribers and followers.
0
 
Support : como fazer
Template Modify by Creating Website
Proudly powered by Blogger